Ad Blocking w/Raspberry Pi

I’ve used different technologies to block ads for a long time. I remember my first computer used Proxomitron to great success in the early web. (HTTPS wasn’t much of a thing back then which made MITM proxies a lot easier to set up!)
My Pi-Hole recently started acting more and more strangely, so I decided it was time to start fresh – and document it this time. I have three goals for this project:
- Have fine control for some devices (my TV) to prevent it from spying on me too much
- Block ads for all devices, especially for ones where it’s inconvenient to add a per-device blocker
- Hide DNS queries from my ISP (Comcast) so they have a harder time spying on me.
With all of these goals, I am well aware that nothing is foolproof. For example, SNI would allow my ISP to do deep-packet-inspection to guesstimate what sites I’m visiting. However, 1) I’m pretty sure they don’t and 2) making things harder is a worthy endeavor.
Here’s how we’re going to accomplish the goal:
- Each device that connects to the WiFi is provided with DNS servers. Instead of Comcast, we’ll change them to point to the IP address of my Raspberry Pi (with a static IP address)
- The computer asks the Pi, on port 53, for the DNS info of some website (or some ad server)
- The Raspberry Pi is running Pi-Hole which checks to see if the DNS request is for a known ad server. If so, it returns a “Not found” response
- Otherwise, the Pi-Hole turns around and asks another DNS server, running on the same Pi, on port 5321 for the real DNS info
- This DNS server is a local caching DNS server, provided by Unbound. Unbound is configured to ask Cloudflare, via DNS over TLS (DoT) to prevent Comcast from knowing much about the request.
- Cloudflare returns the result & DNSSEC information if available. This is cached in Unbound, and then forwarded to the Pi-Hole
- The Pi-Hole validates the DNSSEC certificate, and if valid, forwards it back to the device.
End result: All DNS requests that leave the network are encrypted over TLS. All responses have their DNSSEC response verified. Known ads servers are blocked at the DNS layer. This comes at the cost of 2 extra DNS servers running on the Pi. Also, if the Pi goes down, then so does the internet.
Installing Raspberry Pi OS (Raspbian)
Since the Pi is headless, we need to prepare it to connect to the WiFi before booting. First, figure out your wpa_passphrase by going to http://jorisvr.nl/wpapsk.html (or running wpa_passphrase locally). This especially helps if there are funky characters in the SSID or the password. Then create a file wpa_supplicant.conf in the root directory of the SD card, with the following content:
country=US
ctrl_interface=DIR=/var/run/wpa_supplicant GROUP=netdev
update_config=1

network={
ssid="YOUR SSID HERE"
scan_ssid=1
psk=YOUR_WPA_PASSPHRASE_HERE
key_mgmt=WPA-PSK
}
For whatever reason, this file is extremely picky with formatting, so you might need to play around with it to work properly. Also run touch ssh on the root directory as well, to enable SSH access.
If all goes well, a few minutes after booting the Pi, we should have SSH access. The first thing we can do is to run passwd and change the pi account password from the default raspberry. Next, let’s get automatic updates going:
sudo apt-get update && apt-get install unattended-upgrades
echo 'Unattended-Upgrade::Origins-Pattern {
//      Fix missing Rasbian sources.
        "origin=Debian,codename=${distro_codename},label=Debian";
        "origin=Debian,codename=${distro_codename},label=Debian-Security";
        "origin=Raspbian,codename=${distro_codename},label=Raspbian";
        "origin=Raspberry Pi Foundation,codename=${distro_codename},label=Raspberry Pi Foundation";
};' | sudo tee /etc/apt/apt.conf.d/51unattended-upgrades-raspbian
Next we can harden up the SSH account to use publickey only: This is /etc/ssh/sshd_config. After changing, you can use sudo service ssh restart and make sure it still connects on a new shell.
#	$OpenBSD: sshd_config,v 1.103 2018/04/09 20:41:22 tj Exp $

# This is the sshd server system-wide configuration file.  See
# sshd_config(5) for more information.

# This sshd was compiled with PATH=/usr/bin:/bin:/usr/sbin:/sbin

# The strategy used for options in the default sshd_config shipped with
# OpenSSH is to specify options with their default value where
# possible, but leave them commented.  Uncommented options override the
# default value.

LogLevel INFO
PermitRootLogin no
StrictModes yes
MaxAuthTries 6
MaxSessions 10
PubkeyAuthentication yes
PasswordAuthentication no
AuthenticationMethods publickey
PermitEmptyPasswords no
AllowUsers pi
ChallengeResponseAuthentication no

UsePAM yes

X11Forwarding yes
PrintMotd no

AcceptEnv LANG LC_*

Subsystem	sftp	/usr/lib/openssh/sftp-server
Installing Unbound
Now, to setup Unbound. I mostly followed this guide and this config.
First, run sudo apt-get install unbound dnsutils. Then, add the following to /etc/unbound/unbound.conf.d/pihole.conf
server:
  verbosity: 0
  access-control: 127.0.0.1 allow
  aggressive-nsec: yes
  cache-max-ttl: 14400
  cache-min-ttl: 1200
  do-ip4: yes
  do-ip6: yes
  do-tcp: yes
  hide-identity: yes
  hide-version: yes
  interface: 0.0.0.0
  interface: ::0
  pidfile: /var/run/local_unbound.pid
  port: 5321
  prefetch: yes
  rrset-roundrobin: yes
  so-reuseport: yes
  tls-cert-bundle: "/etc/ssl/certs/ca-certificates.crt"
  use-caps-for-id: yes
  username: unbound

 # forward-addr format must be ip "@" port number "#" followed by the valid public hostname
 # in order for unbound to use the tls-cert-bundle to validate the dns server certificate.
 forward-zone:
   name: "."
   forward-tls-upstream: yes
   forward-addr: 1.0.0.1@853#one.one.one.one
   forward-addr: 1.1.1.1@853#one.one.one.one
Save the file, and then let’s start Unbound: sudo service unbound restart. Now we can test that it works with something like dig terminal.space @127.0.0.1 -p 5321. Note that you’re looking for more than just a wall of text, you want to be sure to get an IP address back in the Answer section like so:
;; ANSWER SECTION:
terminal.space.		1200	IN	A	74.208.92.166
Once that’s working, now it’s time to set up the Pi’s networking. First, stop Unbound from mucking with the local DNS resolver with sudo systemctl status unbound-resolvconf.service. Then, open up /etc/dhcpcd.conf and add whatever static IP settings you need. Here are mine:
interface wlan0
        static ip_address=192.168.1.86/24
        static routers=192.168.1.1
        static domain_name_servers=1.1.1.1 1.0.0.1
The domain_name_servers part is important because the router is going to point back at the current device for the network’s DNS. So if we don’t hardcode it here, the Pi can get jammed up if the local DNS stops working for whatever reason. Once that’s set, you can reload the settings with sudo systemctl restart dhcpcd.
That Pi-Hole life
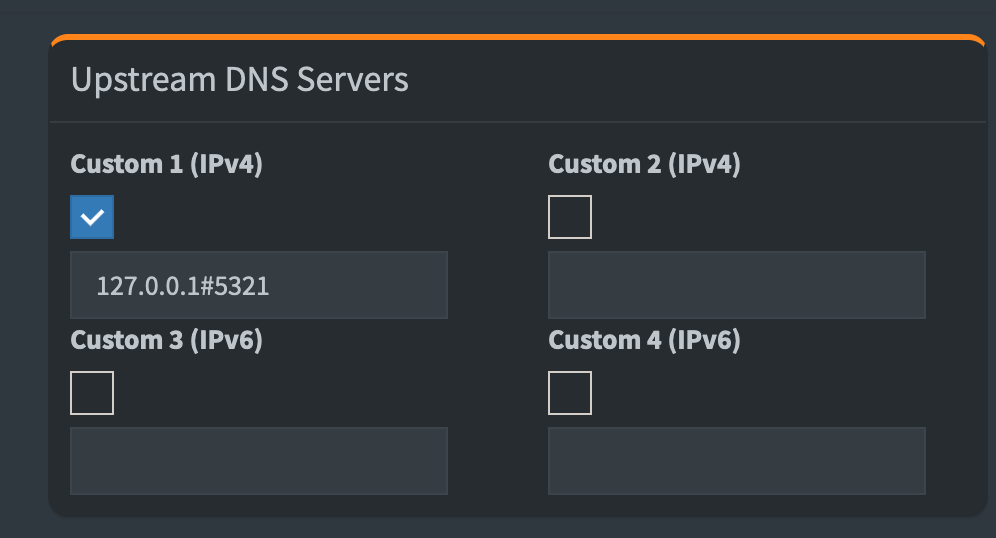
Next, it’s time to install the Pi-Hole properly. Run curl -sSL https://install.pi-hole.net | bash and follow the installation steps. You can always change the settings in the admin UI later. After installation, change the web password with pihole -a -p. Lastly, go to the web settings (http://192.168.1.86/admin in my case) and change the upstream DNS settings to point to 127.0.0.1#5321, and enable DNSSEC on the Pi.

It’s important to uncheck all of the other servers, as we don’t want any leakage. Now, we can test that the PiHole works with dig terminal.space @127.0.0.1 (note that without the -p option) and making sure that works.
And that’s a wrap
Now that everything works, you just need to change the DHCP settings on your router to point to the Pi-Hole & it’s all good to go. Take that, ads!